Thursday, October 29, 2020

Technology Spotlight: Google Meet

I started off the year using Zoom, but when SO many of my students were having issues logging in, it would take up my entire class time just trying to trouble shoot.

We are a Google Edu county and made the switch to using my Google Meet link that is located within my Google Classroom. I knew that Google was going to be rolling out different updates throughout the fall to make our Google Meet experience better.

I wanted to share some tips and tricks that I have discovered to make using Google Meet easier for teachers.


Using Meet Through Google Classroom:

Turning the Google Meet link is simple. In the top right corner you will click on the Gear icon (settings menu). When that opens up, scroll down until you see the section titled Google Meet. If you have never used this feature you will need to generate a link the first time. Then you can toggle between  allowing the students to view the link or not viewing the link. I suggest that you only have the link viewable during your live class times because students are able to click on the link without a teacher being present.

Host Settings:


There are now host settings where you can control the meeting room. You can make it so that no one is allowed to share their screens. You can also turn off the chat feature for students.

The Quick Access option will make it so that anyone who is not invited to your Google Meet link will have to ask to join the meeting.

These settings can be found in the bottom left corner where the little blue shield with a lock icon is located.


Sharing Your Screen:

To share your screen you will click on Present Now and then you will have some options. I prefer to use share a Chrome tab. This makes it so that the tab is always presented and the students don't see if you switch to a different tab. It is super easy to switch to a new tab when using this option. When you click on a new tab you will see the option at the top of the screen to share this tab instead. You can also choose to share a window or share your entire screen. I will use the entire screen option if I am showing them how to access something on their Chromebook or if I know I will have to click on a link and a new tab will open.

Other Options:


In the bottom right corner are 3 dots, which we know with any Google product means there are more options. When you click on the 3 dots, the menu to the left opens up. This is where Google has been updating some of their features.

At the top you can see a Whiteboard option. This opens a Jamboard. You can choose from a blank Jam or you can open one from Google Drive that you have already created.

Change layout is another option that is important. As a teacher you will want to be able to see all of your students at one time, so you can choose the Tiled layout and then choose how many tiles you want to see at one time on the bottom. If you are attending a Google Meet meeting where someone is presenting you can change your view to the Sidebar. This puts the shared screen in a large format and then you can see some of the participant videos on the right side. (this is good to share with your students if they complain that the screen is too small).

Another new feature is the background blur. Participants and host can choose to turn on the background blur so that you can't see what is behind the person in the video. It does warn that this may cause the computer to run slower.

You can also see in the menu that you can choose to record a meeting, as well as, turn on captions. Always check the 3 dots menu to see if any new features have been added.


Chrome Extensions for Meet:

The Google Chrome store is a place where you can applications you can add to your Google Chrome to help with productivity, quickly access tools, etc. Before adding any extensions, I ALWAYS look at the reviews and star rating. People are always creating new extensions and some of them do not work or are not effective, so the ratings and reviews will allow you to see what other people think about them.

Before Google Meet added the tiled layout option where you can see more people in Google Meet, I had added the Google Meet Grid View (fix) extension. I still use it sometimes because it keeps the videos tiled in an organized manner and it also puts myself and my shared screen in the top right corner, which I like because I don't need to see a large area telling me that I am sharing my screen.

Google Meet Breakout rooms is another extension that I have added. It allows the host to create breakout rooms within Google Meet. I have only used this twice so far because most of the time when I am using a breakout room it is for another teacher to pull a small group, so I will just create a quick Google Meet link, drop it in the chat and then have both Google Meet sessions open.

My favorite extension so far is Google Meet Attendance. This extension tracks who enters the Google Meet, how long they stayed, if they left and come back. You can create a list of who you are expecting in the meeting and save it for each class so that you can easily see attendance at the end of the meeting. It also downloads a file at the end onto your computer that shows you a spreadsheet-like document with each participant and their attendance data for that session. This was created by a teacher who knows the importance of privacy, so this extension does not collect any data of the users.

There are always new extensions being added, so you can always check the chrome store regularly for any updates. I am also going to be writing a blog about my favorite Chrome extensions in the near future.


I am hopeful that Google will continue to make Google Meet better as we continue in this new territory of virtual classrooms.
Instagram: @mrspotterstyle
Twitter: @apotter730


Monday, October 26, 2020

Virtual Calm/Relax Room

I saw an amazing idea on Twitter from user @FutureDocMartin about a virtual classroom to relax and unwind.

I thought this was an amazing idea to have available for our students, especially during this stressful experience of virtual learning.  I decided to create my own so that I could cater it to the needs of the students at our school.


This Google Slide is shared with students and they can click on the different items that are linked to different activities and websites that they can visit.

1. Tennis Shoes - links to www.gonoodle.com
    This website has awesome videos and songs to get kids up and moving.

2. Pencil Cup - links to a Google slide with 20 videos with step-by-step directions for drawing

3. Laptop - links to www.coolmathgames.com
    This website has a lot of fun math and problem solving games kids can play for free.

4. Clock - links to an online stopwatch
    Sometimes students may want to take a little break and this allows them to keep track of time. Some kids     are also taught to do deep breaths for a 30 seconds to a minute to help them calm down when frustrated.

5. Aquarium - links to a live camera at Monteray Bay Aquarium

6. Notebook - links to a Google slide that shows students different ways they can write for relaxation

7. Blocks - links to https://toytheater.com/build/ where kids can build with virtual blocks

8. Colored Pencil Cup - links to https://pbskids.org/games/coloring/ where kids can color pictures online

9. Stereo - links to a Google slide with different YouTube videos with relaxing music
    I chose to use Google slides here rather than linking directly to YouTube because then I can eliminate the     ads and I can choose the specific music I want them to have access to.

10. Puzzle Pieces - links to https://www.roomrecess.com/pages/JigsawPuzzles.html
    This is a website with virtual puzzles.

11. Game Board - links to https://www.safekidgames.com/board-games/
    This is a website with virtual games.

12. Books - links to a Google slide that explains the different way to access books online

Teachers can share this virtual room with their students via Google Classroom so that they have access to it whenever they need it.

Another idea is having the professional school counselors add their bitmojis to the room and have a link to their email so that students have a way to connect with them if they need to talk.

Twitter: @apotter730
Instagram: @mrspotterstyle


Thursday, October 22, 2020

Clip and Cover Activities

When making my busy boxes for my daughter I realized there were certain things I wanted her to work on with the clip and cover box. She loves the idea of using the clothespins, but she also likes using the computer or tablet to do some of the activities as well.

I decided to make my own clip and cover activities that can be used 3 ways.

1. Printable - all of my clip and cover activities can be printed on computer paper and laminated or on card stock. I recommend printing them with 4 slides per page so that it does not use up as much paper, but they could also be printed 1 or 2 per page as well. When you go to File, click on Print settings and preview, and then change where it says 1 slide per page to Handout - 4 slides per page. It prints best in landscape.

2. Digital activity - if you would like for your child/student to complete the activity and then submit it so that you can grade it, you can assign them a copy of the presentation. There is a clothespin image on the right side in the grey area that they can drag and drop to the correct match.

3. Self-checking Digital activity - this version allows your child/student to work independently on the activity. If they click on the wrong match, it will take them to a page that says oops, try again. If they click on the correct match, then it will take them to the next slide. Students should use this in Present mode, so they do not need editing access to the presentation. The one downside, is the teacher will not know what the students click on, so this would be more of a center activity where the students are just practicing.

Each activity linked below has all 3 of these version already built into the one Google Slides presentation.

I myself making more of these in the future, but I started off with ones that my daughter can use to practice for school.

Match the uppercase letter to the lowercase letter.

Match the image on the right that rhymes with the larger image on the left.

Choose the letter that begins the word in the image.

Choose the letter that ends the word in the image.


Click on the links above to get your free copy!


Instagram: @mrspotterstyle
Twitter: @apotter730

Monday, October 19, 2020

7 Days of Dollar Tree Busy Boxes

I am currently teaching from home while my 5 year old is also at home attending virtual kindergarten. The times that she is on the computer with her teacher are amazing. She participates, she is engaged, she is loving it. (however, she still asks me every day when she can go back to school)

The issue arises when she is on her breaks, specifically, her break from 11am to 1:50pm. Unfortunately I am trying to teach live for at least 2 of those hours so I needed to come up with things that would keep her busy. I reached out on social media and someone suggested busy boxes.

I took a couple of trips to The Dollar Tree and came up with these 7 busy boxes.

Box #1:


This box uses a container, alphabet flash cards, and rice. She draws a flash card and then uses her finger or the eraser end of a pencil to trace the letter in the rice. Give it a shake and draw another card.

Box #2:

This box uses a container, play-doh and shape flash cards. She picks a flash card and then uses the play-doh to make the shape.

Box #3:

This box uses a container, kid's tweezers (found in the school section) and two bags of beads. She can use the tweezers to pick up the beads (works on fine motor skills) and then sort them by size, color, make a pattern, etc.

Box #4:

This box uses a container, pipe cleaners, and 2 bags of alphabet beads. I created my own sight word cards (find them here), but you could use index cards as well if you don't have access to a printer. She draws a sight word card and then uses the beads to spell it while putting them on the pipe cleaner

Box #5:
This box uses a container, dot marker, sticky notes, and number flash cards. (I split the number flash cards into 2 groups and saved the other half for another project). She picks a flash card, then uses the dot marker to put that amount of dots on a sticky note.

Box #6:

This box uses a container and clothespins. I created my own version of clip and cover cards to focus on matching uppercase and lowercase letters. I am working on others as well, so those will be in a future blog post. You could also use index cards for this as well.

Box #7:

This box uses a bag (because I didn't buy a container large enough to hold the dice), stickers, dice (2 for a $1), and sticky notes. She rolls the dice. Add the two numbers together. Then put that amount of stickers on the sticky note.


A few things that I have learned while letting her explore this week. I had to learn to let go. While I made directions for all of them, the end goal is that she is staying busy and keeping me alone while I teach. This means that when I come back and her hands are green from the dot marker and she has drawn a picture instead of making dots. It is totally ok. When she put the sticky notes all over the house... it is ok. When she wants to just play with the rice, play-doh, or beads... it is ok.

I see myself making more of these in the future because they were fun to put together and she enjoyed helping me. Stay tuned for more!

Instagram: @mrspotterstyle
Twitter: @apotter730


Thursday, October 15, 2020

Technology Spotlight: Google Forms

With so many people teaching online right now, this is the perfect time to get yourself familiar with Google Forms.

We often associate Google Forms with assessments, which it is the perfect tool to use for that purpose, but it can do so much more!

Here is a presentation that is pretty much a step-by-step for how to set up a Google Form and all of the different tools and options you have while creating it.

Click here to access the presentation.

Google Forms can be great for assessing students, especially with a quick multiple choice quiz that can grade itself. It is also a good assessment tool if you want to provide immediate feedback to a student. For example, you can add sections to your form, where if a student selects the wrong answer, it can take them to a section that has a video to reteach them the concept and then they can try the question again. (this uses the go to section based on answer function)

Here are some other ways to use Google Forms:

  • reading logs
  • communication logs
  • scheduling
  • choose your own adventure
  • attendance trackers/daily check-in
  • classroom library check-out
https://sites.google.com/view/amberpotter/home
Twitter: @apotter730
Instagram: @mrspotterstyle


Monday, October 12, 2020

Long Vowel Digital Basketball Activities

My next set of word work activities go along with other common long vowel sounds. These long vowel sounds include the following:

  • ai and ay
  • oa and ow
  • ew and ue
  • igh and y
  • ee and ea
If you are looking for activities that go with the long vowel sounds that are vowel-consonant-e, you can find those activities on this blog post.

I am super excited about this set of activities because they are more "fun" than previous ones as I am getting more comfortable creating digital resources. This set of activities have a basketball theme, where students will pick a basketball on the main slide. It will take them to a new slide with an image. Students must identify whether the item in the image has the short vowel sound or long vowel sound. If it has the long vowel sound, they should identify which spelling pattern it has. For example, if the image is of a goat, they must identify that it is a long o sound and uses the oa pattern.

If the student gets the vowel sound correct, they add 1 point to their score. Students will double click on the score board and change the number. Each correct answer is worth 1 point. Students can choose to play until someone gets to 5-8 points. There are 16 slides with images in each of the activities. The last slide contains an answer key in case the students are unsure of what an image is or what the spelling pattern is for a word.

Here are some sample images:


Click below to get your free copy of the activities:


Instagram: @mrspotterstyle
Twitter: @apotter730


Thursday, October 8, 2020

Personal Dictionary and Vocabulary Instruction

This post is one of my follow-up posts from the book Culturally and Linguistically Responsive Teaching and Learning by Sharroky Hollie.


This book discusses three focuses with vocabulary instruction.
  • honor the words students bring from home
    • we need to expand their home vocabulary to include academic vocabulary
  • equip students with skills for success
    • we are not teaching memorization of words, we need to teach strategies for word acquisition
    • we need to help develop usage of the words of academic vocabulary
    • we need to influence word choice, especially in teaching situational appropriate
  • utilize tools for success
    • personal dictionary
    • personal thesaurus

Here are 5 steps for teachers to use for vocabulary instruction:
  1. Select vocabulary or "tier" words based on frequency and relevance to the topic being taught
  2. Teach the Tier 2 or academic words as concepts, not as words to memorize (focus on 5-7 words during vocabulary instruction)
  3. Use a personal thesaurus to develop synonyms and antonyms
  4. Use vocabulary strategies to develop meaning and representation
  5. Use a personal dictionary to develop Tier 3 or content-specific words

Tiered Words:
  • Tier One - common, everyday words
  • Tier Two - "words that students should know as mature language users"
  • Tier Three - content-specific words that students should be aware of, but will not come across on a regular basis
**remember we are teaching the Tier 2 words during vocabulary instruction

Vocabulary Acquisition Strategies:
  • using context clues
  • memorizing the meanings of word parts
  • developing synonyms and antonyms

I love the idea of a personal dictionary and thesaurus, especially during virtual learning. It is extremely easy to have students use a dictionary and thesaurus digitally. I created two different versions of the dictionary, one for primary students and one for intermediate students.

The primary dictionary is going to be more like a visual dictionary. Remember that these should be those Tier 3, content-specific words that students should be aware of, but not necessarily use or see every day. In the kindergarten and first grade level, these digital dictionaries could be completed as a class rather than individually.


The intermediate dictionary is going to be a little more detailed. Rather than having just words and images, we are adding the definition and a personal connection to the word. This allows the students to own the word when they make that personal connection. 


Just like with the dictionary, for the thesaurus there will be 2 versions, one for primary and one for intermediate. The primary thesaurus is going to focus more on using higher-levels words for basic words that students use on a daily basis. There will be one slide for each word that the teacher or student wants to add to the presentation, and then the student or teacher can add synonyms and antonyms for that word on the slide.


The intermediate thesaurus is going to be more for building academic vocabulary. The slides are set up so that students can add the word that they "own". They then will come up with their own synonyms for that word. The teacher is then going to help them come up with those Tier 2, academic vocabulary synonyms and antonyms, to help students deepen their understanding and their academic vocabulary.


If you want students to have their own copy of the digital dictionary or thesaurus, I would recommend sharing the presentations with students through Google Classroom and choosing the option to make a copy for each student. When you do this, all students will get their own personal copy, but it also puts a copy of their dictionary/thesaurus in your Google Drive. This is helpful if you want to add anything to a specific child's dictionary.

Instagram: @mrspotterstyle
Twitter: @apotter730


Monday, October 5, 2020

Short and Long CVCe Vowel Activities

 I took a break from creating word work activities because they begin to all look the same. After focusing on virtual learning and math for the past few weeks, I have decided it is time to tackle the within word sorts from the Words Their Way word sorts.

First up is the Short and Long CVCe vowel sounds.

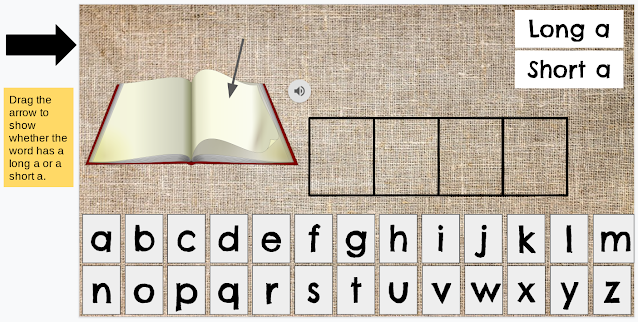
There are 4 activities since there are not many common CVCe words with the long e sound. The activity includes two parts. There is an image of a word and an audio file stating the name of the word (if the file shared properly, more about that at the end). Students listen to the word and then drag and drop the letters from the bottom of the slide to spell the word correctly. Students then drag the arrow from the side to show whether the word has a short vowel sound or a long vowel sound.


If for some reason the audio file does not work when you make a copy of the presentation. It is super easy to record and insert an audio file.
  1. Go to https://online-voice-recorder.com/
  2. Click on the red microphone button to start recording.
  3. Record the word, then hit the stop button.
  4. You can edit the recording by dragging the slider on either side.
  5. Click on save. This saves the mp3 file to your computer.
  6. Go to Google Drive and upload the mp3 file to your drive.
  7. Once in Google Slides, go to Insert Audio and find the clip that you saved to your Drive.
  8. Move the icon to wear you want it on the slide. (I choose to keep the setting where students have to click on the icon to play the word rather than playing it automatically)


Instagram: @mrspotterstyle
Twitter: @apotter730


Sunday, October 4, 2020

Sight Words

Bonus Post! I have so many ideas right now that I am adding an extra post this week.

Now that I have a kindergartener (where did the time go??), I decided to create some easy to use sight word cards.

They are going to go with one of my busy boxes (post coming soon), but can also be used as flash cards.

I kept the flash cards simple so they don't use a lot of ink when you print them out.


There are 5 different levels:

Instagram: @mrspotterstyle
Twitter: @apotter730


Thursday, October 1, 2020

Kindergarten and 1st Grade Math Anchor Charts

I have received some great feedback on my 5th grade and 2nd grade math anchor charts, so I thought I would work on the other grades.

My daughter is in kindergarten so I started with K and 1st grade next. I figured it would help me understand what she will be learning in school. I will admit, after teaching 5th grade for 5 years straight, it is HARD to look at the standards in the primary grades, try to understand what exactly they are required to do, and then create an anchor chart that covers the required content while being kid-friendly and age appropriate.

I will be completely honest, any feedback would be greatly appreciated. If I am missing a strategy for addition and subtraction that is used in primary grades let me know and I can add it.

Here are some images from my 1st grade charts:


Grab your free copy of the 1st grade charts here!

Here are some images from my Kindergarten charts:


Grab your free copy of the Kindergarten charts here!

Instagram: @mrspotterstyle
Twitter: @apotter730